
This tutorial was made using Paint Shop Pro 9, but the process is exactly the same in PSP 8 and probably in earlier versions.
So you have an image of an object that you want to use in Dundjinni. Perhaps it is a photo, perhaps it is a scan, or a render. To prepare it, there are essentially three steps: 1) cut it out from its background, 2) scale it properly, 3) add a shadow if appropriate, and 4) save as a PNG with Alpha-Channel transparency.
If you have a choice, your starting image should be higher resolution than your intended final resolution for use in Dundjinni. When you reduce it, many of the artifacts of your work will disappear.
Paint Shop Pro offers lots of tools for cutting the image out:
Background Eraser — great when the object contrasts with the background. It just erases the background and leaves the object there! If you can set up the picture, you can make this work. I always try this first.
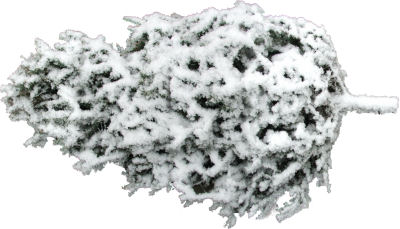
This is a picture of a Christmas tree someone left on the sidewalk just before it snowed. (Actually it was four pictures I pieced together, the tree was too big to fit in a single photo.) I've used the background eraser to erase part of the sidewalk. The background eraser does best when you are erasing something a different color than what you are leaving; colors with low saturation (grays, browns) are not as easy, so you can see it's leaving spots. Still, it did a pretty good job.
The area with the white and pink checkers is a transparent area. The default display is white and gray checkers, but since my object is mostly white, I changed how transparency displays, to get a clearer idea of what was going on. The setting is under File/Preferences/General/Transparency and Shading. When you put an image with transparency over another image (either in Paint Shop Pro, or when you use it in Dundjinni) the object beneath will show through the transparent regions.
When you first use the background eraser on your image, PSP may tell you that it needs to promote the layer. This is fine, just tell it OK and go on. (When using the Magic Wand or other tools, you need to promote the layer yourself. See below under Magic Wand for more about this.)
The background eraser has the usual brush settings for size, hardness and opacity. For most purposes it is easiest to use a large brush size, 100% hardness and opacity. There are some additional settings:
![]()
The setting Continuous Sampling means that, everywhere you click (or hold down the mouse button as you move), PSP will look at the new color and erase that. Usually this is best. If you're worried about accidentally getting onto something you want to keep, you can set it to Once so it only erases the first thing you touched. Limits determines whether it will erase everything of the appropriate colors under the brush (Discontinuous), only parts that are Continuous with the area you are on, or try to Find Edges of the region and erase up to them. If the contrast is very high, Discontinuous works best. If that ends up erasing things you need, try the other settings instead.
The Tolerance determines how similar a region has to be to the area to be deleted. Normally I have the best luck with Auto Tolerance.
Finally, Ignore Lightness is useful if you are deleting a color that varies in brightness. For example, if you put your object on a blue cloth, there will be shadows but the whole background will be blue. Assuming your object is not blue at all, you can turn on Ignore Lightness and not have to worry about how dark or light the blue is.
Magic Wand — selects adjacent points similar to the point you click on. Hold down shift to keep selecting additional points and add them to the current selection. Then either copy and paste into a new image, or invert the selection and delete. This technique is best if your object is fairly uniform in color but your background is variable. (If your background is uniform, you can either use the Background Eraser, or use the Magic Wand to select the background and then delete it.)
When using the Magic Wand or Freehand selection tools, if you want to Crop To Selection or invert you selection and delete (or select the background and delete), you first need to Promote your image. Normally, your image is considered the Background Layer. For our purposes, this means it is the background behind everything else, which means it can have no transparency. By promoting it above the background, we can make sections transparent, which is the goal of cutting out the image in the first place.
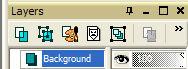 To promote
your image, right-click on the layer (where it says Background)
in the layer palette (shown on the right), and select Promote Background
Layer. The name of the layer will change to Raster
1 to indicate that it is no longer a background layer. Now you
can crop or delete and create transparent areas.
To promote
your image, right-click on the layer (where it says Background)
in the layer palette (shown on the right), and select Promote Background
Layer. The name of the layer will change to Raster
1 to indicate that it is no longer a background layer. Now you
can crop or delete and create transparent areas.
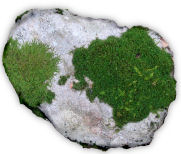
Freehand selection — Outline the objects with the freehand selection tool, then copy and paste into a new image. (You could also outline and delete if you want to do it in pieces.) I use a graphics tablet (Wacom), which makes this easier. This is a perfectly good method for objects with simple and forgiving outlines, like rocks:
|
 |
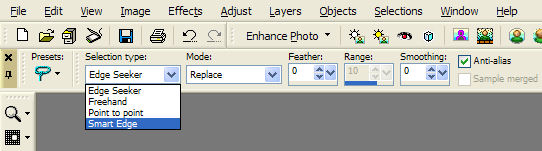
Freehand with extra help from PSP — when you use the freehand selection tool, there are two really nice options for "selection type": Smart Edge and Edge Seeker. Both of these are useful for making PSP follow existing edges, but give it more guidance than just using the magic wand. The selection is made here:
And here's a quick example of a selection made this way (one plank of a snow-covered bridge):

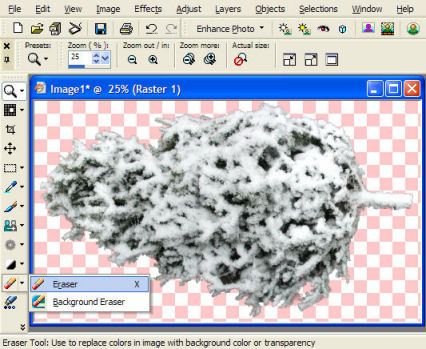
Usually you will have to do some clean-up afterwards (using the Eraser), but the better you do at cutting out your object, the better. If you have accidentally cut out too much, the Clone Brush is good for repairs. Ideally you've kept your image at full resolution, and will later scale it down, at which point many rough spots will disappear. Here's the Christmas tree again, after I've used the Eraser to clean up:
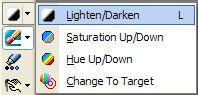
Occasionally I have used the Lighten/Darken brush to shade the edges in places where I've trimmed too much depth. The darken brush is great for manually adding shadows and shading, or adding or removing highlights. For example, when I did my moss-covered rocks, I cut them out with the Freehand selection too, and sometimes cut away too much at the edges (especially parts that were covered in leaves). A little shading with the darken brush at the edges gave the rock a properly rounded-off look. The Lighten/Darken brush either lightens (left-click or drag) or darkens (right-click or drag) the affected area. You can adjust the opacity to make it a weaker or stronger effect. On the toolbar the brush is just above the eraser/background eraser, and is shown (with the flyout open) on the right: |
|
It's a good idea to crop your image down, getting rid of any extra space around it. You can use the Freehand selection tool to outline your object, and then use Image/Crop To Selection to get rid of everything outside your selection. Another way is to copy your whole image (CTRL-C), then paste it as a new image (CTRL-V). This will omit excess empty space. If you still have extra space around the outside, it's probably because you haven't completely erased something out at the edge. Either use the Freehand selection again, but tighter, or go around the outside with the eraser at 100% opacity and hardness, then try again.
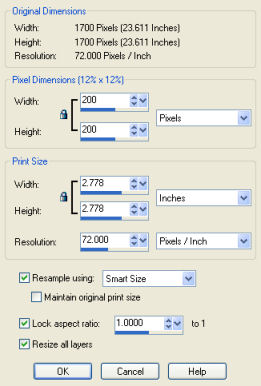
Once the object has been cut out and, if necessary, touched up, you should scale it to an appropriate size. For most purposes, Dundjinni uses a scale of 200 pixels per 5 feet, or 40 pixels per foot. Multiply the length of your object (in feet) by 40 to get your final size in pixels. (If you are making art to use at the Campaign scale, you want 200 pixels per 200 feet, or 1 pixel per foot. So, the length in pixels should be the same as the length in feet.) If in doubt, it's better to make the object a little bit too big than to make it too small. You'll be able to shrink it in Dundjinni, but enlarging in Dundjinni will never look as good. To scale the image, go to Image/Resize. The width and height should be displayed in Pixels, not as a Percent. Enter the width or height that you've determined in the appropriate box. Assuming you leave Lock Aspect Ratio checked, the other dimension will be automatically filled in for you. (You can completely ignore the Print Size settings here.) |
 |
For most objects, you will want a bit of shadowing to help the object appear against the background. The shadow adds a sense of height above the ground. The shadow also helps smooth out the edges of your object. Normally, the best option is to add a "black glow" around the entire object, as if the light source was directly overhead:
 |
 |
No shadow added; overall effect is
flat. |
Drop shadow added. |
If you used a shadow that extended in one direction, but rotated your objects to different degrees, the shadows wouldn't make any sense and they would look wrong to anyone looking at the map. Here's an example:
In Paint Shop Pro, the easiest way to add a shadow is by using the drop shadow effect (Effects/3D Effects/Drop Shadow) with 0 horizontal and vertical offset. Normally I use an opacity of 50% and a blur of 10 pixels, but you can raise these for a larger, darker shadow, or lower them for a smaller, lighter one. You may wish to check the Shadow on new layer box, and then save this image in pspimage format. That way you can easily go back and redo the shadow if you decide you don't like it.
|
 |
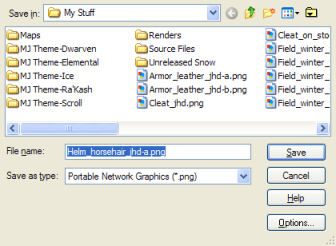
Now we need to save the image we've made as a PNG files with Alpha-Channel transparency. This will allow other objects to show through the transparent parts of our image, and maintain the semi-transparent regions such as the shadow. Select File/Save As, set the Save as type to Portable Network Graphics (*.png), then click Options:
Options gives you the following dialog. Just click Run Optimizer.
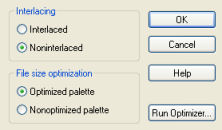
In the optimizer, select the Transparency tab and select Alpha channel transparency. Then click OK.
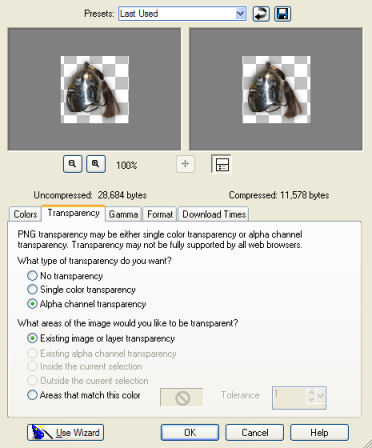
Now give the file a name and click Save. You're done, and the image is ready to be used in Dundjinni.
 If
your object is supposed to be flush with the ground (e.g. a manhole set
into the pavement, a trapdoor set into the floor, a floor mosaic, etc),
you generally will omit the shadow. In some cases, you may even want the
edges of your object to blend with the background, in which case you can
use the eraser with a low opacity and density to feather the edges, or
use the Freehand selection tool with feathering and then either copy the
object and paste it into a new image, or invert the selection and delete.
The small snow-covered bush shown here is an example of an object with
a feathered edge (in this case, intended to blend with a snow background).
If
your object is supposed to be flush with the ground (e.g. a manhole set
into the pavement, a trapdoor set into the floor, a floor mosaic, etc),
you generally will omit the shadow. In some cases, you may even want the
edges of your object to blend with the background, in which case you can
use the eraser with a low opacity and density to feather the edges, or
use the Freehand selection tool with feathering and then either copy the
object and paste it into a new image, or invert the selection and delete.
The small snow-covered bush shown here is an example of an object with
a feathered edge (in this case, intended to blend with a snow background).