
My primary source for Dundjinni art is my camera. I use a Fuji Finepix S5100 digital camera which I like very much. Before it, I used a Canon Powershot A70, which I also liked until the lens broke and Canon wanted me to pay them $150 to fix it or replace it with someone else's repaired and equally old camera. Apparently it's a common problem with Canon Powershots. For that much money I preferred to upgrade to something that doesn't have a known problem.
Ranting aside, most cameras will do fine. Digital, of course, is a huge advantage, since you can take hundreds of pictures, throw away the ones that didn't work out, and pay nothing for them. A decent sized memory card is a must-have. I had 256 Mb with my Canon and have 512 Mb currently with my Fuji.
You don't need a top-of-the-line camera, since Dundjinni is not going to use full resolution images anyway. 3 megapixels is plenty, 2 would probably be fine as well. (My Fuji is 4, but the Powershot A70 was 3.) Camera phones take terrible pictures, though.
Here are a few pointers that will help you get the best results.
The best lighting is on a gray or overcast day, or in uniform shade (e.g. you're behind a building). If you take pictures in direct sun, you'll have strong shadowing and highlights, which make it difficult to use your pictures except in the correct orientation. If you rotate them, they'll have shadows that are inconsistent with other parts of the map.
If your camera has a white balance option, use it. If you don't, pictures on gray days or in shadow may have a blue cast that you'll need to remove in your graphics program. If you can select a white balance intended for cloudy days, that will save you a step and get you better color overall.
Under shadow conditions, you may get pictures that come out blurry because the exposure length is long. (You may also get a camera shake warning.) Forcing the camera to use a faster shutter speed will help. Shutter-priority is one way to do this, another way is to use a Sports or Action setting.
Avoid using the flash. Flash makes things look flat, and makes the color unnatural.
Hold the camera as high as you can, and point it straight down. This is a little challenging, just do the best you can and if it doesn't come out right, delete that one and try again. I'm 6'2" and I still often take pictures without being about to see what I am taking until it's done.
Take the pictures at full resolution. That gives you the maximum opportunity to crop and edit. When you finally resize the image to the correct scale for Dundjinni (200 pixels per 5 feet), your image will come out sharp even if the original was a little blurry.
If you're taking pictures of something with straight lines that you want to line up with the edge of the photo, forget it. Paint Shop Pro has great rotation and perspective removal tools, so as long as it's full resolution you can always fix the picture later. Just make sure you do so before shrinking the image. Actually getting things straight in the original picture is all but impossible. I've done very successful brick tile sets by using PSP's perspective warp tools.
Hold the camera at a consistent height off the ground, and try to keep it pointing straight down.
Take LOTS of pictures. When I do a tile set, I try to take 6-12 pictures of similar areas, and then I make one tile per picture. The more variable the textures will be, the more pictures you should have. I've taken literally hundreds of pictures on a single walk. (Someday maybe I'll catch up and make tile sets out of the rest of them!)
For what to do once you've got your images, see my Tile Set Tutorial.
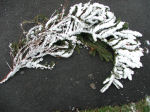
The easiest objects to use are ones that contrast against their background. Anything against a snow background is great. If you can set up your picture, arrange it so you have a contrasting background. This is a little more challenging when dealing with natural objects (e.g. a plant against a background of dirt or grass) and the best solution I've found is to carry the camera with me all the time so when I find the best opportunities, I can take them. So far I haven't started carrying around a blue screen to put under things, but it may only be a matter of time. Here's an example of a plant against snow, and a snow-covered tree branch I moved onto black pavement so I could get a more useful picture:
 It's difficult
to take useful pictures of very large objects, since you can't get high enough
above them. Sometimes you can get useful pictures of smaller objects and scale
them as if they were larger. For example, a bush with small leaves may make
a convincing tree in Dundjinni. Very long objects (e.g. fallen trees) you may
be able to take multiple pictures of and piece together, especially if your
camera has a panorama mode.
It's difficult
to take useful pictures of very large objects, since you can't get high enough
above them. Sometimes you can get useful pictures of smaller objects and scale
them as if they were larger. For example, a bush with small leaves may make
a convincing tree in Dundjinni. Very long objects (e.g. fallen trees) you may
be able to take multiple pictures of and piece together, especially if your
camera has a panorama mode.
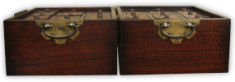
Sometimes straight down is not the best angle. A slight offset may make it easier to identify the object. You have to be careful not to overdo it, though. Compare these two top-down views of the same object. One shows a simple wood box, the other shows a little bit of the drawers:

Once you've got your images, see my Object Tutorial for more about what to do next.